Sew Sushi So Cute! 🍣
A Felt Food Sculpture Project for the Art Room
If you’re looking for a soft sculpture project that combines sewing skills, design thinking, and pure joy — felt sushi is it.
This project is always a hit. Students love the recognizable forms, the bright colors, and the fact that they get to create something that looks almost good enough to eat (but definitely don’t 😉).
We use this lesson to introduce basic hand-sewing, soft sculpture construction, and craftsmanship — all wrapped up in a playful, accessible format.
If the students are learning machine sewing, the nigiri sushi are a great project to move their skills beyond the basics.

Why Felt Sushi?
This project teaches:
- Basic running stitch or whip stitch
- 3D form building
- Stuffing and shaping
- Color and pattern choices
- Craftsmanship and patience
Plus — it’s sushi. Instant engagement.
Materials
- Felt sheets (white, black, red, orange, yellow, green)
- Embroidery thread (matching or contrasting)
- Sewing needles
- Polyester stuffing
- Fabric scissors
- Pins
- Optional: hot glue for younger students
Let’s Sew! Step-by-Step
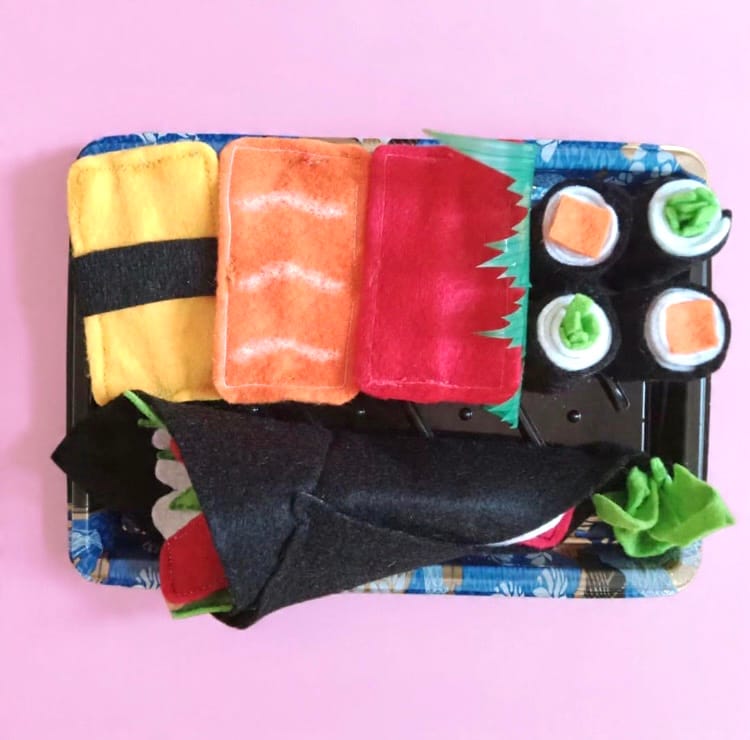
1. Start with Simple Nigiri (Great Beginner Piece)
Nigiri is the perfect place to begin.
Rice Base:
- Draw a rectangle the size of your desired nigiri on white felt.
- Draw four rectangles – one attached to each side of the first rectangle. You’ll now have a shape similar to a plus sign.
- Cut out this shape.
- Fold the sides up and sew the four seams to make a “box” without a lid. Turn inside out to hide stitches. This is the “rice”.
Fish Topping:
- Cut two rounded rectangles slightly larger than the “rice” using orange (salmon), red (tuna), or yellow (egg).
- Add simple stitch details to mimic texture if desired.
- Attach to the top of the rice with small hidden stitches.
Optional: For tamago (egg sushi), add a thin black strip of felt and wrap it around the middle like seaweed.
Done! Instant adorable sushi.
2. Try a Sushi Roll (Maki)
These are slightly more advanced and great for students ready for a challenge.
Steps:
- Cut a long black rectangle (seaweed).
- Cut a white rectangle slightly smaller (rice).
- Add tiny colored strips (green, orange, red) for fillings.
Layer them:
Seaweed → Rice → Fillings
Roll tightly and stitch the seam closed.
To make individual round pieces:
- Create a felt tube first.
- Stuff lightly.
- Stitch the ends closed.
- Add a circle of white felt to each end for a clean “cut roll” look.
3. Don’t Forget the Details
Encourage students to:
- Mix colors creatively
- Add texture stitching
- Create a full sushi “set”
- Design a felt plate or tray
You can even display them on a black paper “serving board” for a gallery-worthy presentation.
Teaching Tips
✔ Pre-cut templates for younger grades
✔ Demonstrate threading a needle slowly (twice!)
✔ Model knotting at the beginning and end
✔ Emphasize small, even stitches
✔ Remind students: neat stitching = strong sculpture
For elementary students, you can use larger needles and thicker thread. For middle school, this is a great craftsmanship assessment project.
Reflection Questions
- What makes your sushi look realistic?
- How did stitching affect the final form?
- Where did you show craftsmanship?
- If this were part of a larger installation, what would you add?
Why I Love This Project
It’s soft sculpture without intimidation.
It teaches life skills.
It builds confidence.
And students leave feeling like fiber artists.
Plus, the finished pieces are ridiculously charming.