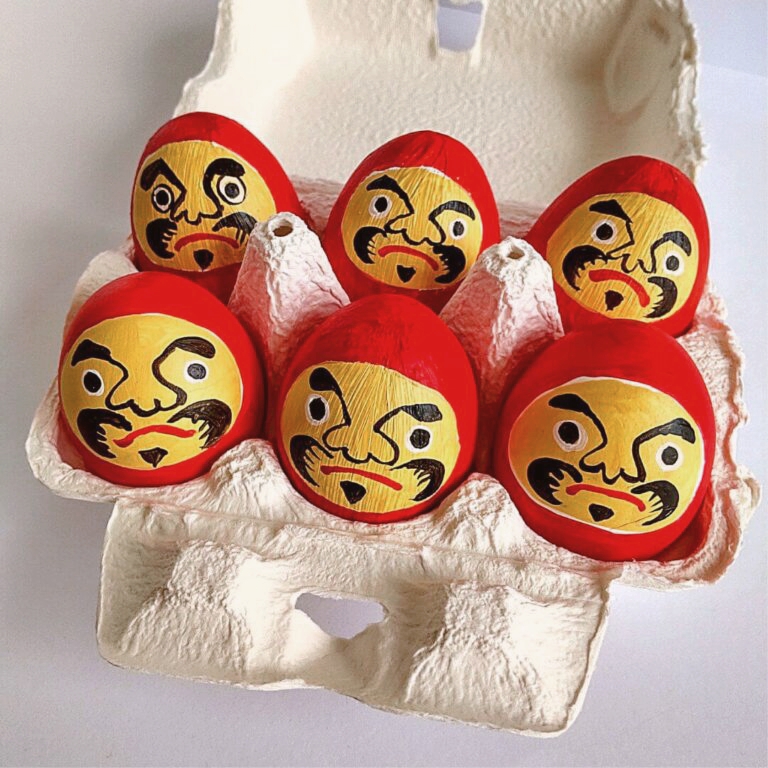
Hello, little artists! Today, we’re going to learn about a special doll from Japan called the Daruma doll. Not only will you discover why this doll is so magical, but we’ll alsllo make one using something you probably have at home—eggshells!
What is a Daruma Doll?
The Daruma doll is a symbol of good luck and perseverance. It represents Dharma, a wise monk who lived a long, long time ago. Dharma had a big dream, but it was a tough goal to reach. He didn’t give up, though! Instead, he kept trying, over and over, until he succeeded.
Daruma dolls have a fun feature—they’re round and weighty, so when you push them over, they always bounce back up! This represents the idea of never giving up, no matter how many times life knocks you down. When people get a Daruma doll, they make a wish and color in one eye. Once their wish comes true, they fill in the other eye.
Daruma and Luck
In Japan, people believe that Daruma dolls help them achieve goals or stay strong through challenges. By keeping a Daruma doll near, people are reminded to keep trying, even when things seem hard. It’s like having a little cheerleader with you all the time!
Let’s Make a Daruma Doll from an Eggshell!
Now, it’s time to create your very own Daruma doll using something you probably eat for breakfast—eggshells! This is a fun and creative way to make a cute Daruma that you can decorate yourself.
What You’ll Need:
- 1 eggshell (carefully cleaned and dried)
- Red paint or a red marker (for the Daruma body)
- Black marker or black paint (for the eyes and face)
- Yellow paint or yellow marker (for the face)
- Glue
- Cotton balls or small paper for the Daruma’s hair (optional)
- A small piece of paper or a sticker (to write your wish)
Steps:
- Start with the Eggshell: First, you’ll need to carefully clean out the inside of an eggshell. You can do this by gently tapping the egg on both ends, making small holes, and blowing out the insides. After that, rinse the shell carefully and let it dry completely.
- Paint the Eggshell Red: Use your red paint or a red marker to cover the outside of the eggshell. Daruma dolls are traditionally red, so paint the entire eggshell, except for the bottom part, which will be the flat side. Let it dry.
- Draw the Eyes: Now, with your black marker or paint, draw two big eyes on your Daruma. Traditionally, the Daruma starts with one eye colored in when you make a wish. You can draw one eye fully and leave the other empty, ready to fill in once your wish comes true!
- Add the Face: Draw a cute little smile or mouth beneath the eyes. You can even add a mustache or eyebrows if you like!
- Decorate: If you want, you can glue on some cotton balls or small pieces of paper to give your Daruma a fun hairstyle, just like the real ones! This step is optional, but it’s fun to make your Daruma look extra special.
- Write Your Wish: On a small piece of paper or a sticker, write a wish or goal you want to achieve. Stick it on the back of your Daruma doll. Every time you look at your Daruma, you’ll be reminded to keep trying and never give up on your dreams.
- Place Your Daruma: Now that you’ve made your Daruma, find a special place to keep it. When you feel like your wish is coming true, you can fill in the second eye!
Daruma’s Message: Never Give Up!
Making a Daruma doll isn’t just about crafting; it’s about remembering to keep trying and never giving up. Whether you want to become better at drawing, learning a new sport, or even reading a tricky book, Daruma reminds us that if we don’t give up, we’ll reach our goals eventually!
So, the next time something gets tough, just look at your Daruma doll and remember the magic of perseverance. You’ve got this!
Happy crafting, and good luck with your Daruma!
To blow out contents of an egg while keeping the shell intact:
- Gently tap the egg on a hard surface to create small holes at both ends of the egg. One hole should be at the top (narrow end), and the other at the bottom (larger end).
2. **Pierce the Shell:** – Using a pin or needle, carefully make a small hole in the top and bottom of the egg. Make sure the hole at the top is slightly larger than the hole at the bottom. This helps the air flow out easily.
3. **Create a Larger Opening (optional):** – If needed, use the pin or needle to gently enlarge the hole at the top so it’s easier for the egg to be blown out.
4. **Blow Out the Egg:**
Hold the egg gently in one hand, with the bottom hole facing down over a bowl.
Put your mouth over the top hole and blow gently but firmly to expel the egg white and yolk into the bowl. You may need to apply a little extra pressure at first to get things started.
5. **Clean the Shell:** – Once the contents are fully blown out, rinse the egg shell with warm water to clean out any residual egg. – Allow it to dry before using it for crafts or decoration.**Note:** Be gentle throughout the process, as the shell can crack easily. Some people also use a straw to blow the egg out more efficiently, as it can provide more direct air pressure.


